- After Effects Tutorial
How to Make 3D Animation in After Effects
Feb 28,2020• Proven solutions
3D animation for your logos, text and so on is very popular in intros and other aspects of post-production, long gone are the days when you would need specialized plug ins to achieve your effects, you can get excellent 3D animation output, relatively simply and easily from out of the box after effects, here we will create some 3D text and animate it.
This is a basic tutorial about After Effects, professional video editing software. However, if video editing is new to you, consider Wondershare Filmora, which is a powerful but easy-to-use tool for users just starting out. Download the free trial version below.
How to Make 3D Animation in After Effects
1. Composition
Our first job is to create the composition. For 3D text or shapes, or if you are importing layered vector graphics such as a logo, there are settings you need to enable on your composition for it all to function.
Either when you select New Composition or on an existing one by selecting composition settings, you need to go to the advanced tab and switch from the default Classic to Ray-Traced 3D render.

Once switched to Ray-Traced 3D, you can then set the options for it. I’ve left the quality at the default 3 for this demonstration, as you can see, the program explains the effects of various quality levels to you on this screen, but remember that render time can increase significantly at higher qualities, so it is a balancing act for what the intended use is. The final setting here will be a personal choice based on what the sequences will be used for and how long you can wait for the rendering.
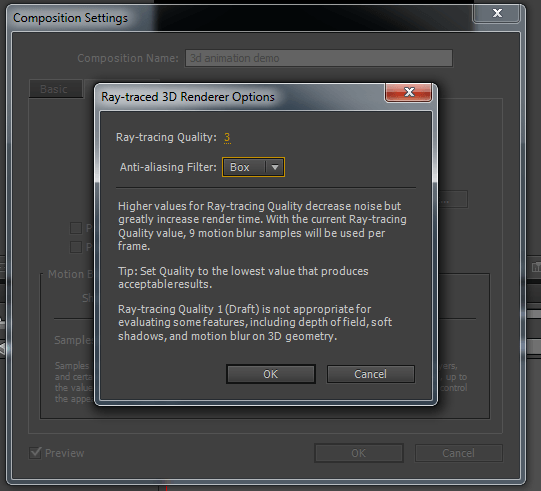
With that done we can create and work with 3D text and shapes from within After Effects itself, so let’s carry on.
2. Creating our 3D text
The next step is to create our 3D text. I created 2 separate text layers for the two words, Wonder and Share, simply because it makes animating them separately a simpler process.

Once created I adjusted the size of the text to how I like it and made sure both layers were in 3D mode in the timeline – the cube icon.

Now that is completed, we can extrude the text for 3D. Within the Ra-Traced composition 3D objects have extra attributes, and selecting our text layer we can find the Geometry Options to create that extruded 3D effect.

Here I have added an extrusion effect to the first layer, a depth of 20 works for this project, but just find a value that you find visually pleasing. Here you can also add bevels and so on, but for this one we are just using extrusion.
Repeating the same on the 2nd text layer gives us too words with an extrusion depth of 20.

Now, that may not look very exciting just now, but stick with it.
3. Creating the 3D look
It doesn’t look particularly spectacular at the minute, however, now we are going to bring out the beauty of these techniques. Our first job is to add a camera to the composition.

And then by right clicking the camera layer once created, create an Orbit Null for the camera
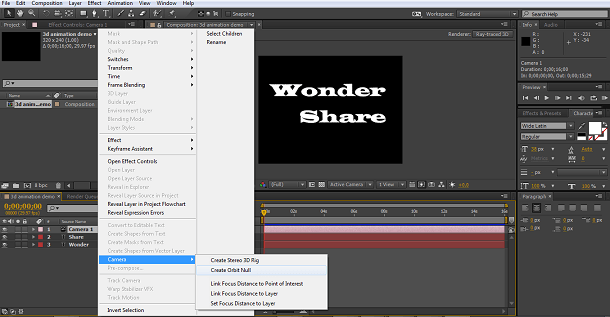
At this point I decided to tilt my text a little to make the most of the 3D effect, simply by using the x, y and z axis on the timeline panel, so now we have this.
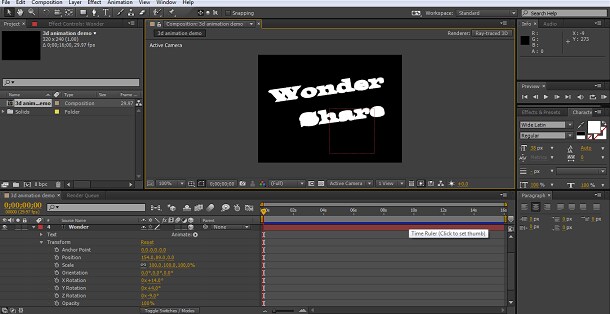
Now, that still doesn’t look so good, but for effective 3D it is worth remembering lighting is everything. We still have light hitting everything equally here, so to get out lovely 3D text we want to add a point light to the composition.
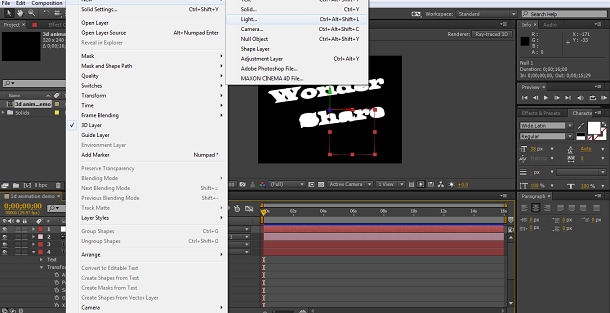
I used the standard settings without changing anything
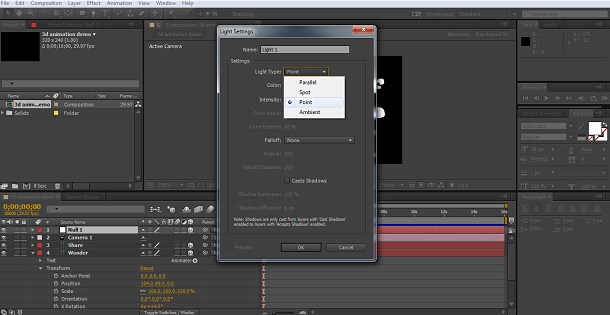
this is the result.
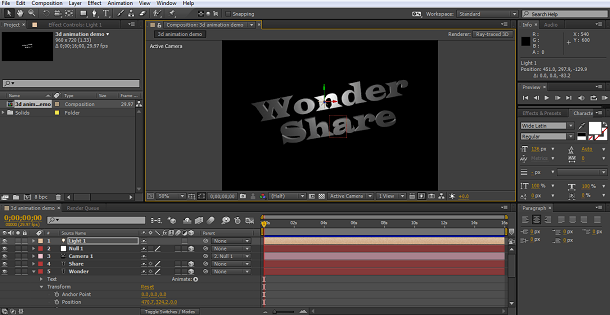
As you can see, we now have wonderful 3D text, now it is time to animate it.
4. Basics of 3D Animation
Now we have some great looking 3D text, we want to make sure we make the most of that when animating it. You could, of course, now simply use the usual transform and position tools to move the text layers, change the color and so on, and if you could this with moving the camera and even the light source you can indeed create some complex animations. But to add more possibilities, our first step is to use a great tool built into After Effects, and that is ‘Enable per character 3D’. This is found under the Animation>Text>Enable per Character 3D> menu path as we can see.

I do this for both text layers, so now we have the ability to apply new types of movement and transformation not just to the word, but to individual characters, all within a 3D environment.
Now we can select the animation we want from the timeline animate button, or if you want to experiment a bit you cans simply click add all transform properties and your layer will include all the animators for you to try.

The first thing I do when working with 3D this was, especially if I’m going to be experimenting as we are here, is to move the time cursor to the end of the composition and set a keyframe for all attributes at that point. What this does is set the end point to be exactly where you are now, so no matter what is added, this is where the word will end up. This can be very useful for later adjustments to make the animation end smoothly when you have a set end point to work to.
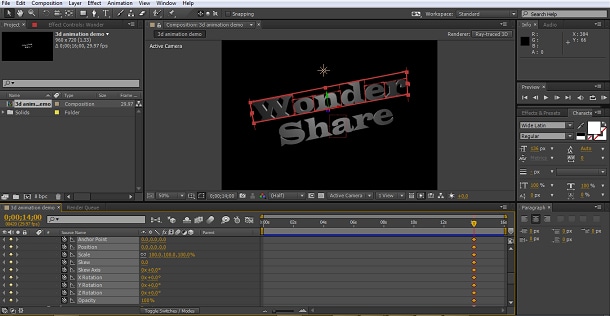
I then repeated the same steps for the other word.
A also added in a color attribute, for the front face only, of each word via Add>Property>Front on the animator attribute in the timeline panel. This is because I thought a nice color transition could add to the effect, I’ve set the end color for the wonder layer as white, and the share layer as blue. I also upped the light intensity a little just to make the effects a little more defined. As you progress through trying out these tools never be afraid to change things up to get the exact look you want. You can always right click and Reset any layer back to the start if you don’t not like what you end up with. The result of all this is the end point of the sequence here.

Now we need to add in our movement.
5Animating the Text in 3D
The first sequence I wanted to do is getting the two words on screen. I also want to flip the colors so they can transform later. I have chosen a simple animation here, with the wonder layer falling into the screen and the share layer rising into it. This is done from the position animation setting simply by altering the y axis values. So with the time cursor at the start of the timeline I set the wonder position to just beyond the screen, which turned out to be -1000, and then set the share value at 10,000 so it rises up into the screen. I also changed both color attributes to be the opposite of the end values. Wonder blue, Share white.

Setting the first keyframe with the words in these positions, I then moved on 2 seconds, set a keyframe for the wonder layer back at its start position, so the animation will show the word dropping into the screen over 2 seconds. I then set a keyframe for the share layer at 3 seconds, so that one rises up and finishes the journey 1 second after the first word, to end up as we are here.

The next part of the animation is to rotate the words along the z axis, so I simply set a keyframe with a rotation value of 1, and then another when I wanted the animation to end for both layers.
The next step I want to do is to apply a rotation to each character in turn, rather than the whole word simultaneously, this is achieved with the offset setting in the range selector.
The exact value here is dependent on how big your word is and so on, experiment until you get the effect you want, but what it does is to apply a delay to the effect for each character so you can stagger how they move.

Then I applied my next rotation, x axis for share and y axis for wonder, with the offset in place, and repeated the keyframes to organize my animation.

As we can see, creating and animated 3D text is in principle as easy as any other animation, the built in tools make creating that 3D text and the lighting very straightforward. The complexity does come when you are planning the animation sequences itself, if you have a lot of moving objects the extra dimension can cause confusion as to where everything is if you are not careful. Plan it out, and work methodically at each timeframe to set each components where you want it to be and you will not go far wrong.
Video Tutorial on How to Create 3D Animation in After Effects
Bring up your video to a professional level with straightforward tools.
Try It Free Try It Free


Liza Brown
chief Editor
0 Comment(s)